2. Pre-Production
2.1. Establishing project goals
As with any project, goals must be clearly identified and defined. This is particularly crucial for digital panorama production, since all later steps will be directed by what is accomplished in the data-acquistion phase. For the purposes of this document, the final authority on the project goals is the person or group commissioning the work, referred to here as "commissioner."
The commissioner determines the primary subject of the project, the primary audience and the overall intent of providing access to that subject and related contextual information. The subject may be a cultural heritage site, a built work of architecture, an art object, or some other kind of significant physical space. The extent and scale of that space must be delineated and then the coverage of the space determined. Since each panorama is anchored at a single viewpoint, the selection of the viewpoint (or sequence of viewpoints for multi-node panoramas) will determine the portions of the space presented to the audience.
However, simple percent-of-coverage is not the only goal: the commissioner should weigh intellectual, creative, physical, and professional aspects of the access to the physical space to be provided by the panoramas. Often there is much more happening in a space than simply the architecture. Works of art in context, such as an altar or statuary, can be photographed and generated into an object panorama (see section 5.1). The intended perspective of the viewing audience should also be considered and what, if any, contextual information will be required.
Lastly, consider how the final product will be used. This depends in part on who will be using the work, but also on who will be generating the data and creating the end-user presentation. Will it be projected alongside conventional slides onto a screen during lectures, or will it be used by students at home? Will it be distributed over the internet to viewers with slow internet connnections or via school equipment that is configured to specific settings? Will narration be required to provide context and explanations? This type of planning will save many hours of work later on.
A digital panorama project is a lengthy process and requires sharp and sustained focus. Competing priorities and a lack of necessary skills have led to mixed results for many ambitious technology projects undertaken by large universities: it may be wise to outsource elements of the project to third-party contractors that specialize in digital panoramas and web design. Depending on resources and budget, hiring external contractors may be the most cost-effective, efficient, and successful method for completing the project.
2.2. Choosing the site
After the subject has been chosen it is important to evaluate practical access issues. There are many factors to consider, the most important of which is access. It may not be possible to actually carry out a photographic campaign of the site. The choice of subject may seem easy but often a site is physically inaccessible due to restoration work, unsafe conditions, or legal and adminstrative restrictions. In these cases the commissioner should re-evaluate the subject and chose an acceptable alternative. These kinds of problems may not become obvious until the photographer actually arrives at the site. For example, suppose that the commissioner wishes to photograph a Greek temple, and the subject is the Temple of Athena on the Acropolis in Athens. Everything seems fine until the photographer flies to Greece and discovers that the temple is completely obscured by scaffolding and cranes. A flexible commissioner might switch the focus to Paestum instead. For both the photographer and commissioner, it is helpful to have a local contact, whether a fixer, historian, or other expert at the shoot if at all possible to avoid these types of unexpected problems (see section 2.7, below).
2.3. Choosing site nodes
In an ideal shoot, there is unlimited time on location to capture panoramas, and the photographer can record every nuance and a few extras that might turn out to be interesting. Unfortunately, this happy circumstance rarely occurs, forcing the commissioner and photographer to strike a balance between time limits, access restrictions, and factors beyond the team's control. Accordingly, plan the shoot as carefully as possible to maximize everyone's efforts. This does not just mean shooting as many panoramas as possible, but also choosing which ones will best illustrate a point and bring the space to the viewer.
If possible, study existing floor plans and illustrations and consider line-of-site from any given node to any other node, especially if they will be linked together via hotspots in panoramas (e.g., a clickable doorway that leads from one room to another), or to a particular feature that might be highlighted. Start by working with a copy of a floorplan. Mark all of the places you intend to shoot a node in order of importance. If you start at the entrance to a building, you might logically move a little way in and shoot another node, to create a virtual tour. Or, you might be better off moving all the way to the other end of the building in order to shoot it first. This choice will require more time between nodes, but will capture more of the space in case something goes wrong. Trade-offs like this should be expected and planned for, and the prioritized list of nodes should reflect the diminishing importance of each one.
Be sure to consider natural and permanent light when planning the nodes. Very few panographers attempt to light their scenes for a number of reasons (see sections 2.8 and 4.6.1). If the panorama represents a moment in time, the viewer would see various lights and cables somewhere in the photograph. If the photographer shoots still frames or multiple passes with a scanning camera, it may be possible to shift artificial lights around so that equipment does not appear in the final scene. However, there is a risk of the natural light changing significantly during that time, and blending or combining images will raise problems. Light reflects and interacts in both obvious and subtle ways that may result in extensive post-production work. Time of day and seasonal changes both affect lighting, and should be taken into consideration with choosing and prioritizing nodes. When shooting a cathedral, for example, it might be preferable to photograph a node on one side of the building in the morning and a node on the opposite side in the afternoon, in order to maximize light coming from each direction. Between those two critical times, the photographer can shoot other nodes that rely less on the light's direction. When shooting exteriors, it may be best to shoot when the sun passes directly overhead or to wait until the sun is low, for the shadows it will cast (but keep in mind that anything in the direction of the sun will wash out). Plan for the sun's movements rather than reacting to them at the shoot.
Consider also the ramifications of placing the camera in relation to the sun or other bright lights. Practically speaking, best results maybe be obtained by shooting in the shadow of a column, utility pole, or other object. Bright lights will wash out a panorama and effectively blind viewers for that portion of the panorama. Putting the camera in a shadow, however, makes it possible to shoot into the light while also achieving a useful result. In some cases, it avoids serious problems such as blooming and lens flare (where a camera's pixels produce pure white informationless data). If there is a choice between putting the camera in a shadow and not, almost always choose the shadow. Aside from blocking the light, shooting from within a shadow negates the problem of shifting light. Even a quickly shot panorama can have tripod shadows between the first still image and the last or the beginning and end of a scan. The sun may appear to move slowly overhead, but shadows can shift significantly in a short period of time and when the tripod shadows in different images fail to align it results in extra work in post-production. Minimizing shifting shadows is one good reason to shoot with the sun as high as possible.
Other practical and predictable factors include traffic (both foot and vehicular); natural elements such as water, snow, rain clouds, dirt, or mud; barriers; safety; permissions; copyright; background; and security. Setting up to shoot a node where many people are walking by may be awkward, particularly if people are not supposed to end up in the image. They may bump the photographer or the equipment and if they are too prominent in the panorama there may be problems with privacy. Similarly, shooting a node near heavy traffic can be dangerous, especially when the photographer's attention is directed at the camera. If you use a scanning camera that feeds into a computer, the choice of nodes may be restricted by the immediate terrain (the laptop should not be sitting in the mud). If ropes or gates block access to particular areas, it might be possible to reach over or through them and shoot from the other side without crossing the barricade.1 It is sometimes necessary to choose a location that is less than optimal but better for the equipment and the photographer. Line of sight can play prominently in spherical panoramas because viewers can look in every direction. If node placements are chosen for optimal viewing in a particular direction, it may compromise what the viewer sees when turning around. Sometimes just a meter's difference will capture both the desired feature and eliminate less desireable objects in the reverse view. The commissioner and photographer should build in enough flexibility to allow for these kinds of small changes on site.
Many places restrict who may access particular areas, but every effort should be made to shoot panoramas in such places, for the simple reason that they are not normally accessible. Shooting in restricted areas can substantially enhance the subject matter for viewers who have no other way of seeing that material.
The commissioner should also consider the artistic quality of each panorama. Placing the tripod in the dead center of a room may show a balanced view in all directions, but unless some particular feature lies directly overhead or below, an off-center location may give a better result. Consider placing the camera somewhere that will offer viewers both foreground and background changes. Placing the camera in the center of the room will minimize features, but placing it nearer to or further from items within the room will heighten and sustain viewer interests.
Placing the camera directly above or beneath particular features will also make the panorama more interesting. If possible, give them something besides ceiling and sky when they look up, and provide them with more than bare floor or dirt when they look down. If the photographer can shoot a node directly on top of a small wall or beneath an overhang, for example, it encourages the viewers to take full advantage of fully spherical panoramas (since, in addition to spinning around, they can look up and down). People like to see the entire context of a place and anything that enhances their experience can only improve the result.
Once all of the shooting subjects are selected, consider the height of your camera. For a given set of nodes, it makes sense to keep the camera height the same through the panorama, so that viewers do not become confused or disoriented. Placing the camera at about eye-level makes sense if the panorama is to show an average person's viewpoint. Alternatively, it might be better to reflect a child's viewpoint or to place the camera on a raised platform or crane so as to get a clearer, straight-on view of the subject matter. Whatever the choice, especially if it is not an intuitive location, it should be explained in the accompanying documentation.
No amount of pre-shoot preparation will substitute for securing the cooperation and expertise of those responsible for the site. Good communication will ensure a smooth time in the field and secure access to restricted areas or at special times (such as before public visiting hours begin). Likewise, every detail of a shoot should be discussed and agreed upon by the commissioner and photographer.
With all of the above in mind, then:
- Prioritize node choices to achieve the goal
- Choose both subjective and objective views where possible
- Shoot everything possible while on site
- Pick the best work for the final compilation
2.4. Environmental considerations/scheduling the shoot
Environmental considerations are not limited to the weather. Unique obstacles, such as religious services, holidays, festivals, siesta periods, and local customs, may interfere with a shooting schedule. It is important to research local customs (including appropriate attire) before arriving at the shoot. Some research with travel agencies, web sites, and local site liaisons (see section 2.7, below) will save time and money.
As discussed above, predicting and tracking the light source on site is critical. The sun and weather play a huge role in the success of a shoot. Artificial light is not desireable for photographing a spherical panorama, so most panoramic photographers use natural light available at predicted times whenever possible. For example, when photographing a cathedral, capture the eastern end (chevet or apse) in the morning, the southern and northern transept mid-day, and the western façade in the afternoon setting sun. The time of year also plays an important role in dictating the quality of light. In the northern hemisphere the summer solstice, June 21, provides the most light to work with. This is usually the preferable time of year to shoot. There are exceptions to this: certain buildings, such as Die Wies in Bavaria, are better shot on a sunny day in the middle of winter, when the light reflects off the snow and through the fenestration up into the dome and vaults.
Though the standard procedure for photographing architecture with natural light is to use sunny skies for the exterior and overcast skies for more even lighting in the interior, a creative photographer will constantly monitor weather and clouds to make the best of any weather situation. Clouds can be used to the photographer's advantage, providing the softer lighting often desired for interior shots, then parting to provide bright sun for an exterior shot. Even rain can create interesting effects; details of gargoyles spouting runoff water highlight the usefulness of otherwise ornamental features. While day-to-day weather and local cloud movements cannot be predicted in advance, normal weather conditions for the site can be checked through resources such as The Weather Channel, The Weather Underground, and the Lonely Planet guidebooks.
2.5. Equipment
Nearly any kind of still camera (digital or film) can be used to create panoramas (see section 5.3 for discussion of video panorama). Note that this equipment can be quite expensive, up to tens of thousands of dollars. In most cases, the photographer will probably use his or her own equipment on the shoot. However, it is in the commissioner's interest to know something about the equipment used for this type of photography and to know something about its limitations. The following discussion provides a guide to the pros and cons of various digital camera designs, which fall into two broad groups: single-shot systems (i.e., point and shoot SLR cameras), and those that methodically scan the image (i.e., cameras equipped with a scanning back). Generally, single-shot cameras (and accessories) produce pictures that must be stitched together to produce a panorama, while scanning systems produce panoramas that require less post-production processing.
When it comes to choosing your panorama tools, it is reasonable to buy as much as you can afford but it is not always best to purchase the most expensive equipment. It might be better to purchase two identical systems in case of mechanical problems, accident, or theft. From time to time, used digital scanning camera systems can be purchased in online auction houses: such devices produce very high quality results, but the complexity of their components leaves much that can go wrong. It may be better to purchase two or even three sets of gear that produce good results rather than one set that produces outstanding images. A digital scanning camera system consists of a camera, lens, laptop computer (screen, logic board, hard drive, disc drive), application software, operating system, cables, computer battery, camera battery, adapters, and a tripod. That's at least thirteen vulnerable points: the camera could be knocked over and its lens destroyed, the laptop may freeze, etc., and it may be difficult or impossible to fix equipment on site. Though these systems produce excellent results, they can prove fragile. If your system will include specialized components, you may not be able to purchase replacements from a camera shop down the street, even in major metropolitan areas. If you can afford a redundant system of this type and ensure its security in the field, by all means do so.
For most educators and scholars, a mid-level DSLR (such as the Canon 30D or Nikon D70) will be sufficient and will achieve appropriate quality. Generally, point-and-shoot digital cameras are undesirable because of the difficulty in controlling exposure settings and attaching external lenses. Many budgets that cannot encompass a high-end system can find funds for a high-quality camera and an identical model purchased for back-up. In terms of field use, this reduces risk to far fewer potential points of failure and a shorter time for recovery. A local camera shop is much more likely to be able to replace any of these components from stock or a back-up unit might be express-shipped if necessary. The flexibility offered by commonly used equipment is a big benefit. Alternatively, it might be feasible to have two sets of gear operating in the field at all times, with more than one person operating them, for faster coverage of a site.
When choosing equipment, don't forget to account for time and money required for software and post-production processing. Images collected by scanning systems are more easily and quickly converted into panoramas, but the required software may have to be purchased separately (especially for second-hand equipment). Still-shot cameras have a wide range of available image-stitching packages, but they may require much more pre- and post-production time to generate top-quality panoramas. If you use a still-shot camera, a precision panorama camera mount is an invaluable accessory. However, don't try to save money by using a low-quality panorama head, since that will lead to manual adjustment in the post-production stitching stage. The image will "float" between frames in each set of images. When pixels are misaligned, they must be corrected by hand in post-production in order to create a good panorama. Each pair of images must be precisely aligned, a time-consuming and exacting process. With high-precision panorama heads, sets of images overlap each other exactly and can be immediately batch-processed.
Image Capture Systems
There are several flavors of image capture systems can be used to create
panoramas, including:
- Point-and-shoot
- Digital SLR (DSLR)
- Automatic scanning systems (35mm-equivalent, medium, and large format), such as Panoscan and BetterLight
- Video cameras
- Geared roll film cameras
Whatever system you end up with will require the same basic elements:a camera, a lens, a tripod that allows for accurate rotation of the lens, and a method of capturing images.2
When conventional film is used, the images must be transferred to digital form in order to be viewed on a computer screen. The most common system is a DSLR camera with a wide-angle lens mounted on a tripod with a special panning head (Fig. 1-2).
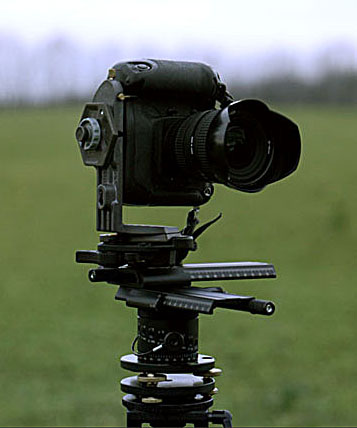
Figure 1. 35mm camera on a segmented panorama tripod head. Photo by Tom
Watson.
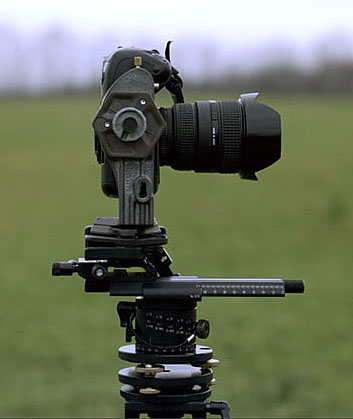
Figure 2. 35mm camera on a segmented panorama tripod head, viewed from
the side. Photo by Tom Watson.
Though the greatest resolution can be gained from a scanning large-format system, the DSLR system is popular for several important reasons. It is more affordable and there is much less equipment required in the field at a shoot (and therefore less opportunity to break something). Compared to working with a camcorder, there is much less post-processing work required to stitch the image and the results are generally much better and of a higher resolution. Redundant DSLR systems are more readily available than scanning systems and roll-film cameras, and replacement parts are generally available at camera shops throughout the industrialized world. And for conventional photographers, learning how to create a panorama with a common DSLR is a natural transition.
Digital cameras differ from film cameras in that they collect data about the image by means of electronic devices rather than film. There are two types of sensors that collect light data about the image, charge-coupled devices (CCD) and complementary metal–oxide–semiconductors (CMOS). Most digital cameras use CCDs, but there are subtle but relevant differences between how these two types of sensors read and record data. CMOS chips have a lower light sensitivity and are generally more susceptible to noise, but use much less power and are therefore well-suited to smaller cameras. CCDs, on the other hand, are more susceptible to becoming dusty, requiring more frequent cleaning. A full discussion is outside the parameters of this guide, but information can be found on several web sites.3
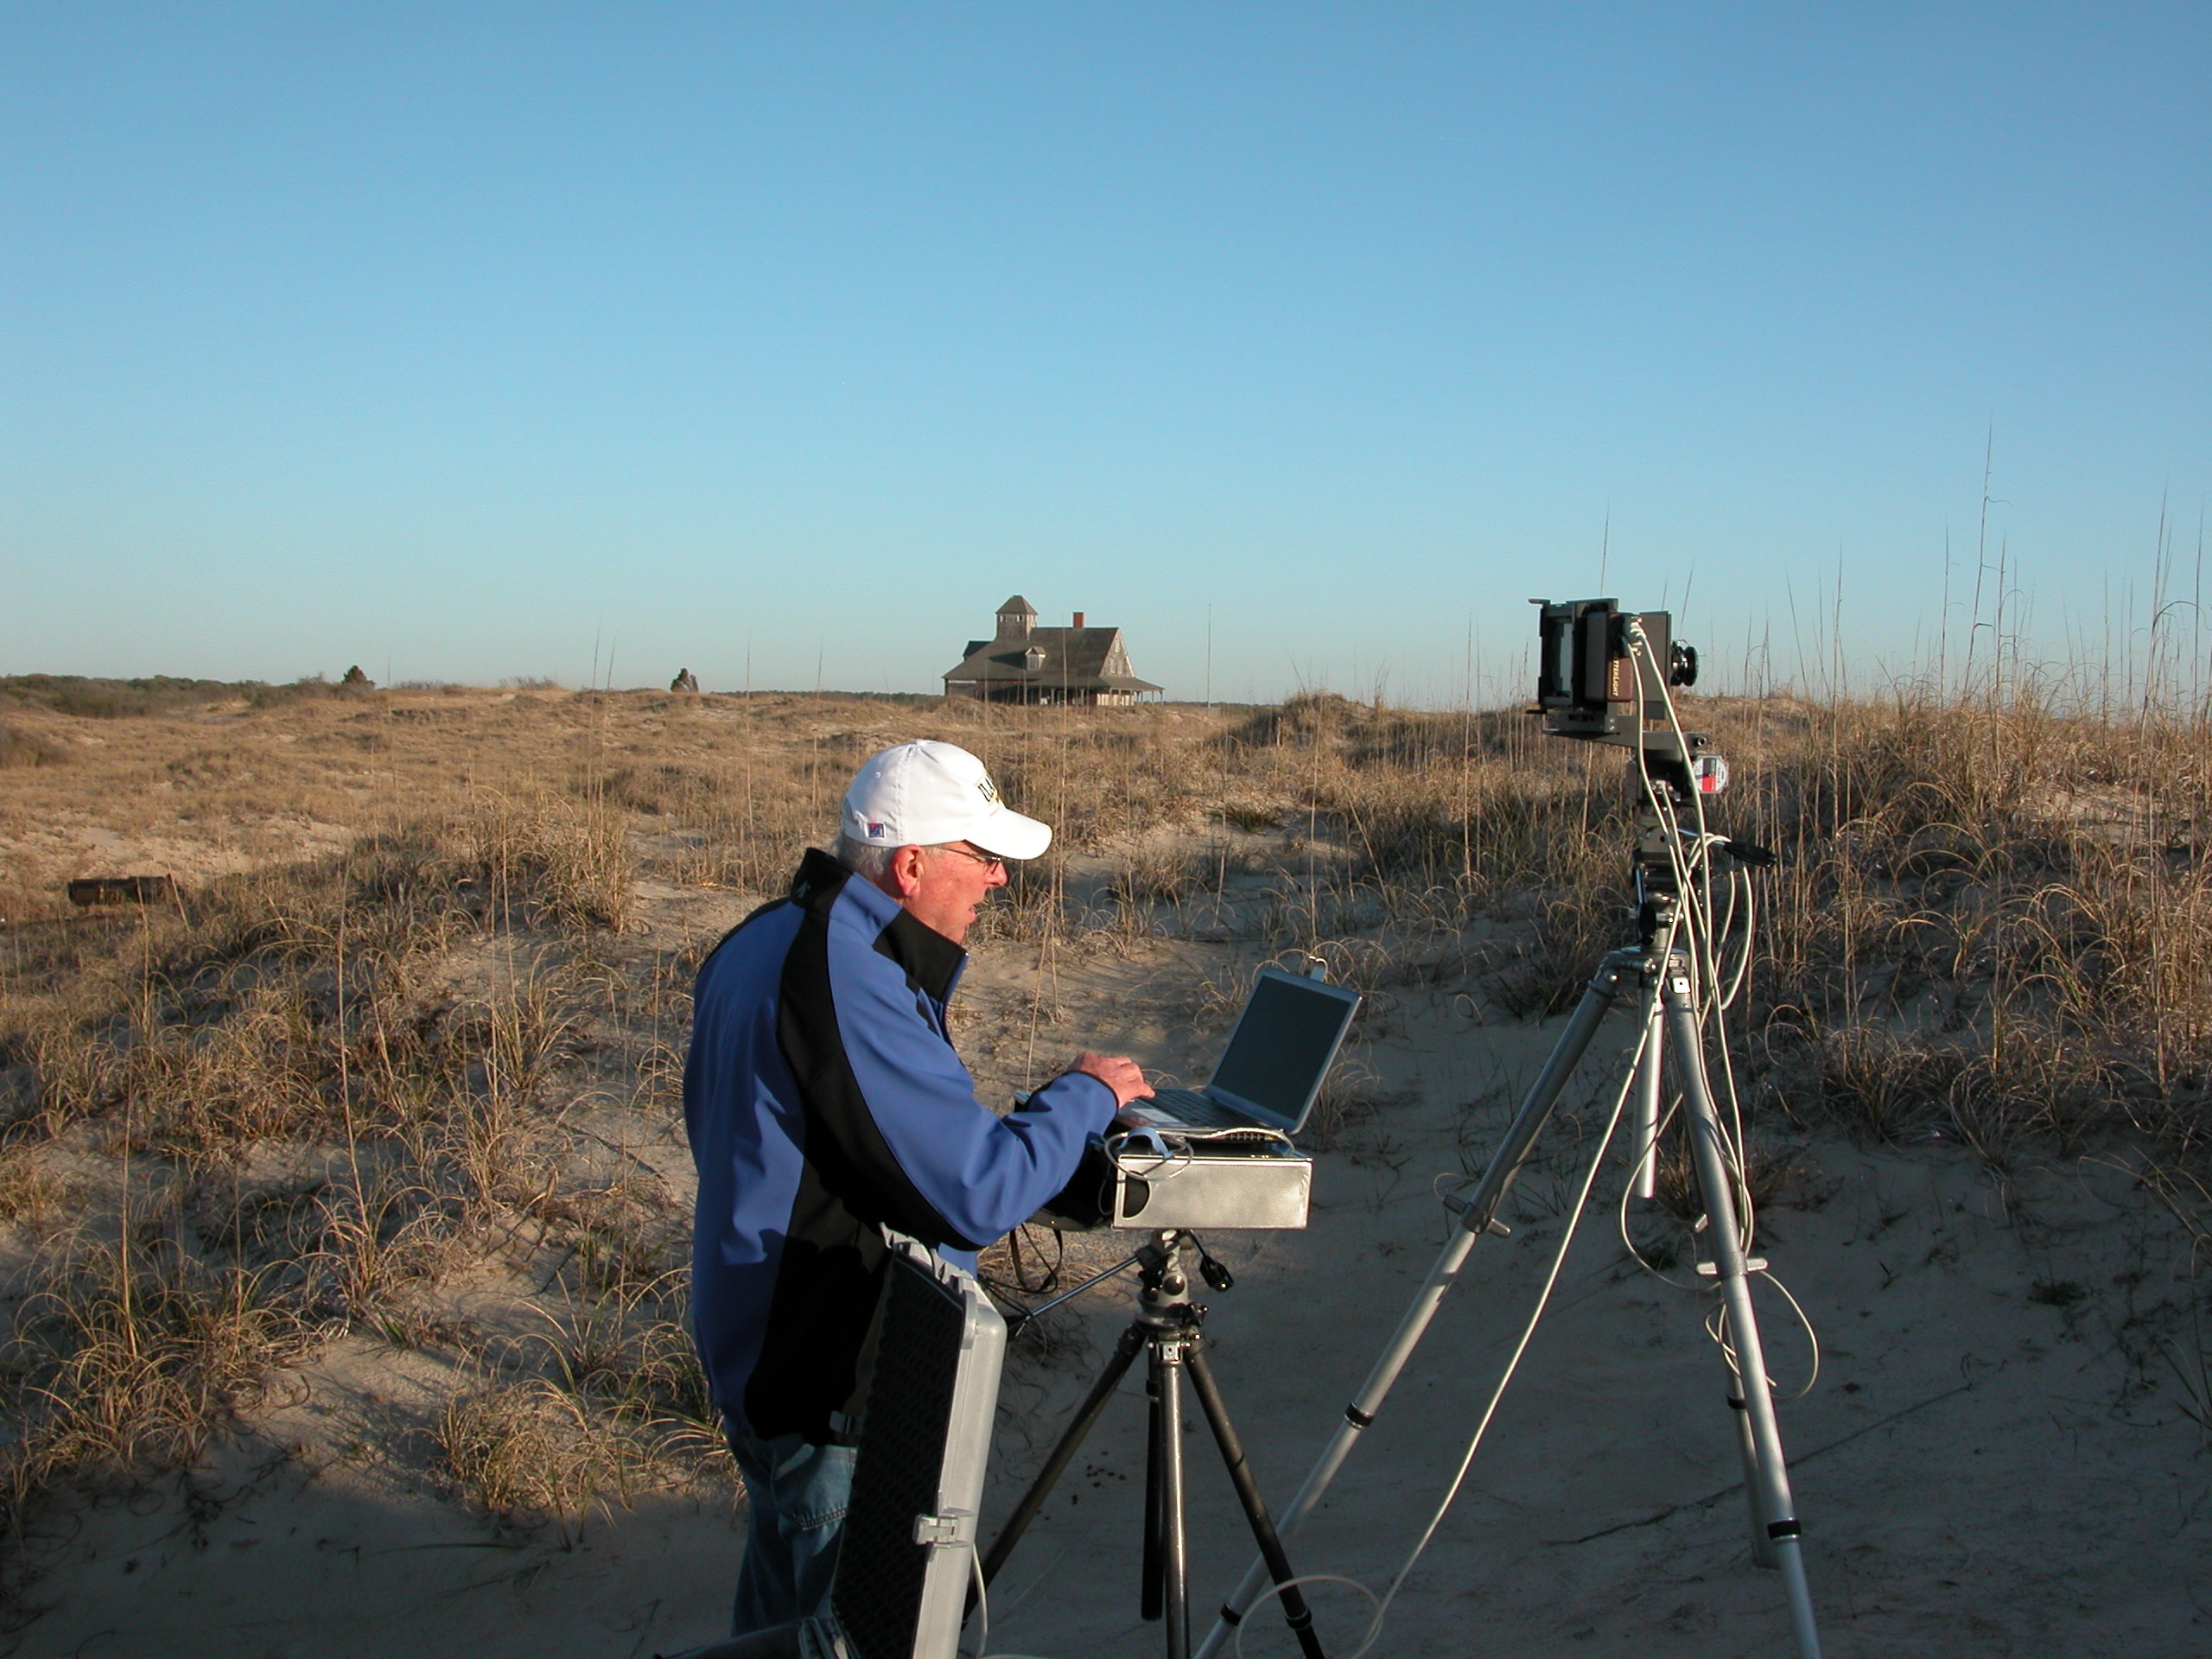
Figure 3. Tom Watson's typical panorama photography set-up. Click picture
to see larger version. Photo by Tom Watson.
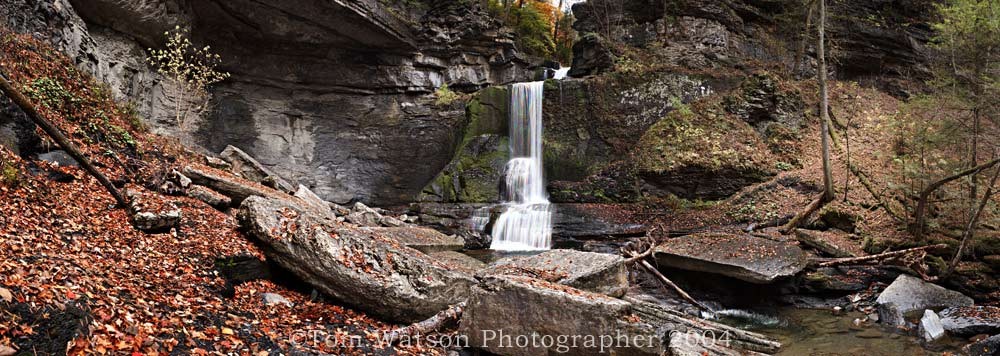
Figure 4. Filmore Glen. The time lapse in taking the panorama led
to the motion artifact in the waterfall. Click picture to see larger
version. Photo by Tom Watson.

Figure 5. This continuous panorama has no motion artifact because the
image was captured at a line time of 1/240th of a second. This image
would be impossible to create using the segmented stitch technique.
Click picture to see larger version. Photo by Tom Watson.

Figure 6. A panorama of the Academical Village at the University of
Virginia in 2006. Click image to see the full panorama. Photo by Tom
Watson.
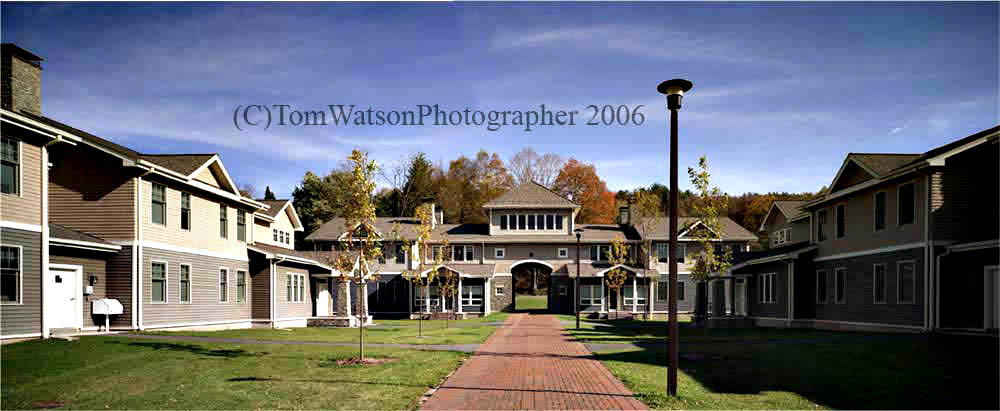
Figure 7. A rectilinear panorama. Click image to see the full panorama.
Photo by Tom Watson.
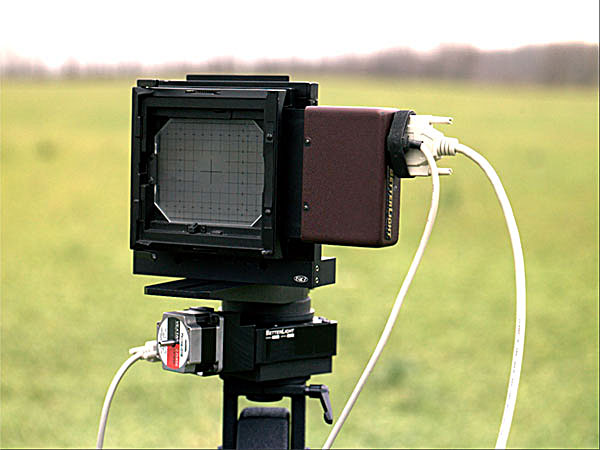
Figure 8. Better Light scan back mounted on a Better Light Panowide
adapter. Click picture to see larger version. Photo by Tom Watson.
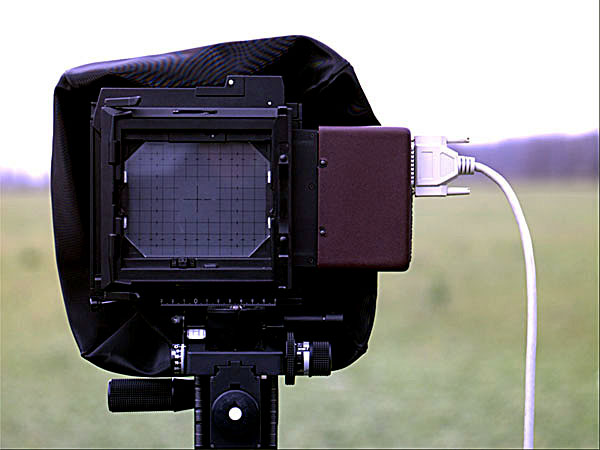

Figures 9-10, above. Better Light with the view camera shifted to the
left and right. The combination of left and right make a rectilinear
panorama image. Click pictures to see larger versions. Photos by Tom
Watson.
- Freedom from the environment of chemical photography
- Superior image quality of the digital file
- Digital work flow
- The profound pleasure of working with large 48-bit color files
Lenses
Anyone who spends time looking at a variety of panoramas will notice the
difference between those shot with an 8mm lens and those taken with a
15mm lens. A smaller lens has a greater field of view but objects will
appear to be further away and can have an apparent distortion on the edges
when a panorama changes view (although this can be adjusted in post-production).
Some viewers have strong aesthetic preferences for one or the other. There
are implications to lens size that may be relevant when choosing equipment.
The ability to zoom in on details in a panorama is greatly affected by
the lens. If the camera has a CCD chip one square centimeter in size,
for example, the amount of detail captured on with an 8mm lens will be
far less than with a 15mm lens, because the light captured from a much
greater field of view must necessarily fall on the same space that captures
more detail in a smaller field of view with a longer lens. This translates
directly into the effective zoom achievable in the final panorama. The
trade-off comes with the number of images needed to capture an entire
sphere: an 8mm lens might do it in four frames, whereas a 15mm lens might
need twenty. (The terms used here, smaller/shorter and larger/longer refer
simply to the number of the lens; the actual physical size of the lens
does not necessarily correlate).
Many photographers prefer to use a wide-angle rectilinear lens with minimal distortion. Fish-eye lenses are also popular because fewer images are required to capture the 360° field of view. However, there are limited software applications that can stitch these images due to patent issues. There are one-shot lenses that are capable of capturing the entire 360° in a single image, but these provide the least amount of resolution and are incapable of capturing complete spherical views.
Tripod and Tripod Head
A panoramic tripod head is an important piece of equipment that is used
to position the lens at the point of rotation (see section 4.4).
Mounted on any normal, sturdy photography tripod, the head also allows
for even measuring of rotation angles, both horizontally and vertically.
Most are manually operated, but some (such as the Panoscan system) rotate
automatically. A good panoramic tripod head will allow for proper positioning
of the camera so as to avoid parallax. Parallax is the apparent displacement
or difference in apparent direction of an object as seen from two different
points not on a straight line with the object. In other words, it is the
apparent doubling of objects in an image, and is a problem that plagues
panoramic practitioners. It is essential to properly adjust the panoramic
tripod head so that as you rotate the camera, the point of rotation equals
the nodal point of the lens. When the head is not properly adjusted, even
by a few millimeters, parallax will occur. Refer to various “how-to”
websites such as PanoGuide
for tutorials on how to properly adjust your tripod head. Manfrotto,
Kaidan, and 360Precision
produce good quality panoramic heads.
Resolution Requirements
A common question asked is: How much data do I need to collect? It depends
in part on what you intend to do with it. Current library collection standards
for scanned film require 3000 pixels on the long axis, shot on 100-400
speed film. If the panorama is only going to be viewed on a typical computer
monitor, it should be at least 72 dpi. If it will be printed, it needs
to be at least 300 dpi (or whatever the printer specifies). It is advisable,
though, to collect data at as high a resolution as possible, so as to
have more options in post-production. The systems that provide the highest
resolution are the automatic scanning systems. The resulting files may
be very large, however, and may require an external hard drive for storage
in the field.
Traveling With Equipment
Last but not least, be sure to consider international shipping and customs
laws before you invest thousands of dollars. There are strict regulations
for shipping hi-tech equipment over international borders and there are
limitations to the amount and weight of luggage that can be carried onto
an airplane. Travelling is discussed in greater depth in a later chapter,
but in general do not attempt to travel with more equipment than the carrier
or country permit.
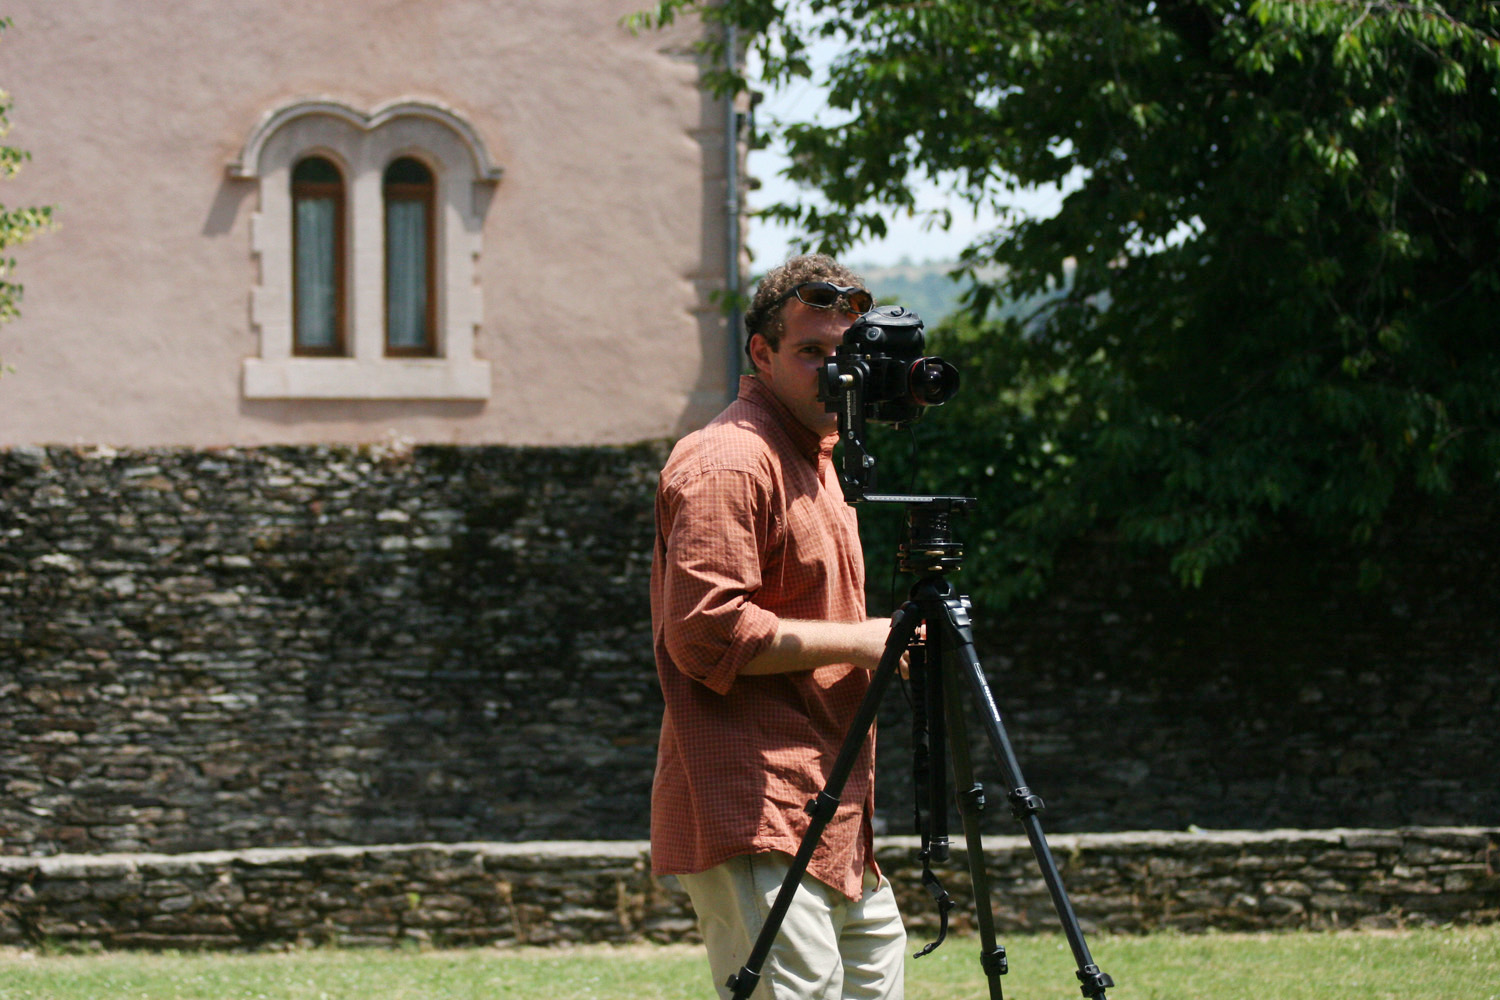
Figure 11. Michael Gross in the cloister of the Sainte Foy Abbey Church
in Conques, France (1050-1120). The system used consists of a Canon
1Ds Mark II (16.7MP digital full-frame SLR), Canon Wide Angle EF 14mm
lens, Bogen/Manfrotto 303SPH Spherical Panorama Tripod Head, Bogen/Manfrotto
055MF4 Magfiber Tripod, and Canon Remote Switch. Click picture to see
larger version. Photo by Barry Gross.
2.5.1 Systems requiring stitching
In the early days of digital panorama creation (the mid-1990s), the usual method was to use a 35mm film camera equipped with a wide-angle lens, orient the camera in portrait mode, and take a dozen or so shots while rotating the camera in roughly equal steps through a 360° circle. With this technique, the camera should ideally be mounted on a tripod and the camera’s position on the tripod should be offset so that the axis of rotation passes through a point in the optical system (commonly termed the "nodal point" and usually located somewhere through the body of the lens), in order to avoid or at least reduce parallax. Photographers used either homemade camera-mounting brackets or purchased specially designed tripod heads from commercial suppliers.
In its essentials, this method is still being used although as digital camera design and capability have improved, film has fallen out of favor; today the overwhelming majority of stitched panoramas are derived from born-digital images. Also, since the advent of cubic and spherical panoramas, there is a need to shoot more than just a single row of pictures around if the zenith and nadir of a scene are to be recorded.
A system for good-quality stitched output might consist of:
- Camera
Preferably (but by no means necessarily) a DSLR model. The main advantage of the DSLR design is the ability to use interchangeable lenses. - Lens
A rectilinear wide angle typically in the range of 14-24mm focal length (35mm equivalent) or a fish-eye (either circular or full frame). Longer focal lengths can be used; they will yield higher resolutions but require more pictures and a lengthier stitching time; fish-eye lenses are widely used because a full scene can be captured with a smaller number of shots.5 - Tripod and panoramic tripod head
While some adventurous workers in the field have made very successful hand-held panoramas, the use of a tripod and panoramic head really is recommended.
2.5.2 Systems not requiring stitching
Stitching can be a vexing and time-consuming process. Errors such as ghosting and mismatched features require often difficult digital retouching and repair in an image-editing application. As part of the stitching process, captured images almost always require remapping from their rectilinear or fish-eye perspective to cylindrical or spherical projections, and image quality can be somewhat degraded by this transformation. Shooting a series of pictures takes time, and non-static features in the scene (clouds, people, vehicles) move between exposures, resulting in ghosting, stitching errors, and associated problems. These difficulties can be largely overcome by non-stitching techniques, in which the camera captures a panoramic scene in a single exposure. There are three basic approaches you can use:
- Rotational cameras
There are different designs, some home-brewed, mostly commercially manufactured. They come in both film and digital versions with varying image scales or film formats. All have the ability to capture a panoramic scene in a single exposure/rotation (and without resorting to a panoramic tripod head). If the objective is to produce an interactive 360° panorama, one stitch is required to join up the two ends so that the image wraps, but this is a trivial matter requiring only an image editor. The main disadvantage of these cameras is that they are expensive (particularly the digital models) relative to the more modest equipment needs where stitching is employed. - One-shot or single-shot systems
A relatively recent development has been the introduction of devices employing parabolic mirrors, the reflection of which can be imaged with conventional digital cameras. A single picture of the reflected scene can then be processed with software to output a cylindrical image.6 Advantages: one shot; no stitching; capturing subject motion; ease of use; can be used with wide variety of cameras. The main disadvantage is that the panorama’s resolution can only be as good as that of a single frame taken with the digital camera. - Scanning systems
Digital scanning backs, originally developed by the military for satellite imagery, are similar to and provide equivalent resolution to medium- and large-format film cameras. Instead of capturing a sequence of individual shots like a digital single-lens reflex (DSLR), they scan the view and create a single complete panoramic image on the spot. With newer systems, the resolution is truly enormous, and the viewer can zoom in to incredible detail. One major difference between panoramic scanners and DLSR setups is that they require a computer be physically connected to the camera in order to operate. This may increase set-up time and introduce another level of complexity in the system. Another consideration is the large file size, which not all computers can handle. While the files can be downsampled to reduce size, they may actually provide far more data than the project requires.
2.6. Travel preparations
Equipment
Traveling with photographic equipment can be quite challenging. There
are changeable restrictions on carry-on, checked baggage, and customs
for all forms of travel. It is generally not a good idea to check expensive
and delicate equipment into an airplane hold. Luggage is often mishandled
and thefts do occur. Whenever humanly possible, carry media, film, and
equipment by hand. The particular risks will vary depending on the destination
and type of travel.
Check with airlines a few weeks before departure so as to have sufficient time to pack gear properly, and be aware of last-minute restrictions or political events that may complicate your trip. Also check the Warsaw convention, an international agreement that regulates liability of international airlines for passengers and baggage. It limits an airlines liability for lost or damaged equipment to a startlingly low number (around US$25 per kilogram of cargo and US$500 for carried baggage). Warsaw was amended in 1955 at the Hague and in 1999 at Montreal, but the revised amounts are still small (approximately US$1500 for baggage and US$25 per kilogram for cargo). Independently purchased travel insurance may offer more coverage. Be sure to check that it covers property in transit, not just at the destination.
Because baggage regulations are becoming more restrictive as of late, it may be necessary to either check or ship luggage. ATA cargo cases (such as Pelican ATA) can be custom-made and are probably the most reliable option when carry-on is not an option. However, beware government import/export restriction when moving hi-tech equipment. For example, shipping computers and hi-tech equipment into Italy is notoriously difficult.
Using luggage Carnet forms sometimes facilitates the process. These are essentially passports for gear: some countries require them when bringing in professional equipment. The Carnet is an international customs document to be presented at each port of entry. It is an itemized list of goods or equipment upon which no duties, fees or taxes are to be collected because the goods or equipment is to be reexported within twelve months. Think of it as a passport for objects. There are yellow, green and white counter foils for custom agents to sign and stamp upon entry and exit from each country traveled through. Failure to obtain entry stamps and signatures or exit stamps and signatures may result in a penalty of up to 40% of the listed value at the next point of entry.
Carnets are issued by the Corporation of International Business. They maintain an excellent website where one can browse all the categories of interest and assess quickly how to proceed, and a help line (1-800-282-2900). The application fee and the bond posting for US$10,000 worth of equipment would cost approximately US$300. When starting a journey from the US, be sure that US Customs has done its job of checking serial numbers, signing and stamping the Carnet before checking in with the airline. This will protect against eager US tax collectors. Note, though, that many countries, such as those in the Middle East, do not accept the Carnet. The CIB website has upbeat and positive language, but it is a news event when another country became Carnet-compliant.
Veteran travelers know that frustration abounds at ports of entry and will have all paperwork in order. Another thing to keep in mind is to always maintain a pleasant tone of voice, relaxed body language and gesture towards the exit saying, "où sont les taxis?"
Film
The main concern for photographers travelling with film is the possibility
of fogging caused by airport security screening. The ideal strategy would
be to obtain film on site, and have it developed locally. But of course
this is not always practical and it may not be possible to obtain particular
types of film locally and/or find suitable processing labs.
Undeveloped film (whether exposed or unexposed9) should never be placed in checked baggage where it is likely to be subject to high-intensity X-ray inspection but instead should always be placed in carry-on baggage. However, even the radiation from the lower-intensity scanners typically employed for carry-on baggage may cause fogging of higher speed films (say ASA/ISO 800 or above) and of slower films if exposed repeatedly through multiple passes through such systems. There is considerable anecdotal evidence (at the time of writing) that medium-speed films can withstand multiple passes through carry-on inspection systems in North America and Europe with no noticeable effects. Lead-lined bags will offer a level of protection in theory, but they will also probably attract attention during the screening process, requiring hand-inspection, or even higher-intensity X-ray examination. In the US at least, it is possible to request that film (and camera equipment) be hand-inspected at security checkpoints. Manual inspection policies in other countries will vary.
Safety
Security and safety for both people and equipment is a constant consideration.
At the risk of pointing out the obvious, when faced with the choice of
losing equipment or risking injury remember that equipment can always
be replaced. Some tips to traveling safely:
- Whenever possible, do not travel alone.
- Always keep a low profile when moving about a city or in transportation centers, such as airports and train stations. Keep equipment packed and inconspicuous.
- Avoid storing equipment in cases with obvious logos that suggest valuable contents.
- Be aware of your surroundings. Thieves may wait to steal equipment or money after a shoot, so it is a good idea to take a cab directly from the site back to the hotel and store all gear safely before going out again.
For tips on traveling safely, refer to the Savvy Traveler, The Washington Post Travel section, and The New York Times Travel section. Since many national and regional newspapers are available on the web, it may also be worthwhile to read the local news before making travel plans (Newslink.org has links to papers all over the world) and to consult the U.S. State Department about travel considerations for the area.
Some regions of the world are simply too dangerous to visit. In these cases it may be possible to hire local photographers. If necessary, it may be possible to arrange a training session in a neutral country.
Insurance
Get proper travel health insurance and equipment insurance and be sure
to read the fine print: many policies do not cover equipment "in
transit" (while it is traveling on an airplane or being shipped).
And many policies that claim to cover equipment in transit in fact only
cover catastrophic events, such as floods and fires. In that case, if
boxes disappear or equipment breaks, tough luck. One of the best options
is to ship equipment with FedEx and to declare the value of the packages.
This is similar to insurance, but they will replace the equipment (rather
than issue a claim check). However, be aware that when the declared value
of the equipment will be used when calculating duties. Many film photographers
develop their negatives at a trusted local developer before returning
home in order to avoid problems with x-ray scanners at airports. The Large
Format Photography Forum has a section on Location
and Travel, including discussions on traveling with film. When entering
a country it is always a good idea to say that you are traveling as a
tourist, avoiding mention that you are traveling for work or study unless
you have work or student visas. Immigration customs, police, and other
border officials can be unpredictable in some countries. In some cases,
bribery is
necessary for the project to continue, though is not sanctioned by the
writers or distributors of this guide.10
In some cases, professional liability insurance may be required to protect against damage caused by the photographer. Some locations may require a minimum US$1 million in coverage.
Backing up data
Redundant copies of data are an excellent idea, but when traveling overseas
it is even better to maintain copies of data on multiple continents. One
option is to send back-up DVDs to a trusted recipient back home during
the trip. In that case, it is wise declare a value of US$1 for the data
so as to avoid hefty import/export tariffs and questions about conducting
work without a work permit.
2.7. Local site liaison (Mr. Fix-It/Fixer)
The local site liaison, a.k.a the Fixer or Mr. Fix-It, can be an invaluable assistant. This is a local person who knows the proper procedures for getting necessary permissions to shoot, is familiar with local customs, and is familiar with the area. He (or she) can be especially helpful in a country with a lot of red tape, such as Italy. A Mr. Fix-It can also provide on-going services such as:
- translator
- driver / guide
- information on local customs and food
- help finding the best photo shop for film, development, and repair
- intimate knowledge of the site and other sites that may not yet have been considered
A good site liaison is generally a local scholar, photographer, filmmaker, or local guide who lives in the area and is hired to deal with logistics on a local level. Contact local academic institutions and post a request for a local liaison to university list servers, or check with local guide companies, travel guides, hotels, movie/film companies, cultural attachés, embassies, state department recommendations, or local press contacts. In some countries (Germany and England in particular) taxi drivers often are very knowledgeable and can be hired as a guide for the day. Be sure to negotiate compensation in advance. With the right local guidance, the shoot will go smoothly and everyone will be happy.
Other preparations
Bring a letter of introduction from the commissioner, institution, or
university. The letter should be notarized and could even include certifications
by “apostille”
(a seal attesting that a notary is registered, which is accepted as the
recognition of other countries’ official documents under the 1961
Hague Convention). Business cards, as well as many copies of all your
documents, are also good introductions and proof of intent. The more documents
you can supply in support of the project the better. Contact the cultural
attaché of the countries you are visiting and ask for a letter
of support. Letters of support should be on official letterhead from the
head of the university or institution, as well as the commissioner, professor,
and project director. Photographers should have information showing their
professional credentials.
What to do when the local site liaison fails
Sometimes Mr. Fix-It fails, so have a back-up plan in the form of alternate
contacts or a strategy to deal with logistics on-site. Even with the best
of intentions, you will not always be the highest priority for the liaison
and his or her contacts, and there is always the risk of scam or sheer
incompetence. For best results, use a liaison with good credentials and
strong recommendations from friends or colleagues who live or work in
the area.
2.8. Site access and resources
Gaining access to a site can sometimes be as simple as providing a wish list to the local site liaison. More likely, the commissioner and/or photographer must do much of the legwork. Generally, the first step is to determine who is in charge of a building and who is authorized to grant the appropriate permissions. A good place to start is by calling the press office, if there is one, since it often handles everything, including scheduling the shoot. More obscure sites may not be so well-organized, in which case some creative thinking is called for. In Italy, for example, there is an entire bureaucracy for handling the rights of the cultural property of the state, and each city its own bureaucracy. Unfortunately, these organizations are generally not very efficient, so the key is to be persistent. Authorities may not respond to paper or electronic correspondence so be ready to phone or visit the office in person, perhaps several times.
When determining who controls a site, a great place to start searching is the World Wide Web. A website for the site may have phone numbers or the name of a foundation or group that supports the site. The following are some examples of different types of sites and who controls them:
- Religious Site (e.g. church, mosque, temple): depends on who owns the building. Begin with the religious office. In Italy, the building may be controlled by one of the various soprintendenze (e.g. Soprintendenza Archeologica di Roma; Soprintendenza Beni Ambientali e Architettonici di Roma).
- Public Space (e.g. square, street, park): Contact the city film commission (in Italy, the Soprintendenza di Film) for permits.
- Archaeological Site: If the site is an active dig, contact the archaeologist or institution who is in conducting the research. In Italy, try the Soprintendenza Archeologica for the city where the site is located.
- Museum: Press office for the museum.
- Library: depends on who owns the library (university; religious organization; city); sometimes libraries are owned by non-profit organizations. Contact the director, if possible.
- Residence: private individual; foundation or cultural trust (generally a trust will preserve buildings by a particular architect, e.g., the Frank Lloyd Wright Preservation Trust).
- Private Company (e.g. bank): contact the public relations office or the office manager for the company.
- Government Building (e.g. City Hall): contact the building management office or visit the tourism office.
- School/University Campus: contact the public relations department or the Office of the Architect.
- Transportation Hub (e.g. airport terminal, train station): contact the press department of the transportation authority, often a division of city government or an independent public authority. Security clearance is likely a requirement for photographers, particularly for airport terminals, and may take an extended period of time to obtain.
Besides the initial challenge of gaining access, the project staff or photographer must study and secure required resources for a shoot: power, lighting, storage, transportation, translators, etc.
Power
Power requirements are often tricky. Older buildings have a limited number
of power outlets, and they are often not conveniently located and are
not grounded. Old buildings tend to have old wiring that cannot handle
the high amp requirements of electronic equipment and lights especially
(remember, watts = volts x amps). America uses 110 volts, 60 Hz. In Europe
and other parts of the world, they use 220-240 volts, 50 Hz. Many power
adapters for battery chargers and computers are capable of handling both
systems, but check the label before relying on them. Different countries
use different shapes for their power outlets. Steve
Kropla's Help for World Travelers has information on international
electrical settings and telephone connections.
The easiest solution is to buy a travel kit with all possible adapters, and bring as many as might be required. Remember that at any given time on a shoot power might be needed to run a computer, charge camera batteries, back up data to an external hard drive, and run lights.
Lighting
Unlike traditional architectural photographers, panoramic photographers
generally prefer to rely on natural lighting (see sections 2.3
and 4.6.1). Artificial lighting increases
the complexity of a shoot by an order of magnitude, and introduces problems
that would otherwise not exist. For example, a wall with a fresco must
maintain a certain temperature range and environment, and the use of bright,
hot lights might be prohibited. Also, site managers prefer to keep the
equipment used to a minimum so as to avoid interference with the normal
flow of visitors. One tripod is normally not a problem, but lighting equipment
can present quite an obstacle. Furthermore, in a 360° scan the equipment
will be visible.
Storage of Equipment and Cases
Keep equipment cases out of view of the shot whenever possible, for the
sake of both convenience and security. Be sure to find a secure place
to store the cases, such as an office, security desk, or the locked trunk
of a car.
Roads and Transportation to the Site
Many sites are located in cities with a plethora of transportation options.
In some cases, it will be easiest to drive to the site, but be aware that
parking can be an issue, especially if the site is in a crowded or insecure
area. Cabs are a good option but are not always reliable. Subways or trains
are often cheap and reliable, but require carrying all of the equipment
(up and down flights of narrow, steep, crowded stairs). Also keep in mind
that during peak hours the carriage may well be standing room only and
there may be a short window of time to maneuver through the crowd and
off the train (not an easy task with large, heavy cases).
Sites that are not located in major metropolitan areas present a different set of problems. In Europe, the train system is wide-spread and generally good, but there are still many places that are a long and expensive cab rides from the closest train station. In this situation, it may make sense to rent a car.
Translators and cultural liaisons
A local site liaison can be very useful in handling language and cultural
issues. This is discussed in depth in section 2.7.

Figure 12. Orthodox monastery of Hilandar at Mount Athos before and
during the 2004 fire. Photo by Brian Donovan.
2.9. Budget
There are three tiers of production systems — call them base, average, and platinum — and the best choice depends on the balance between requirements and resources. The commissioner should discuss the differences in quality verses acceptable costs with the photographer well before the shoot (see section 2.5 for information about equipment options). It should also be clear what costs the commissioner will cover and what costs the photographer will cover. For example, is the photographer responsible for getting travel insurance and liability coverage for possible damage to the site?
The commissioner's budget should include production, post-production and long-term maintenance of the project. It will need to encompass the following categories:
Equipment
This covers all the equipment for the shoot, such as: camera, remote switch,
flash media, lenses and filters, tripod head and legs, laptop computer,
stitching software and image editing software, flash media card reader,
travel cases and backpacks, power adapters, and external data storage.
Normally the photographer owns or has access to most of this equipment
and has to purchase only a few items specifically for the project, such
as stitching software and the panoramic tripod head. It may also be possible
to rent or borrow individual pieces of equipment. Universities may have
equipment loan pools or an art department that will loan equipment for
special projects.
Travel
This generally includes flights, travel insurance, local transportation,
hotels, per diem food costs, communications, guidebooks, and maps.
Fees/Licenses
Besides visa fees for entering some countries, there may be fees for use
of a site. Many sites waive fees for educational use of site photographs,
many charge a reduced or full fee. This can range from just a few dollars
to hundreds of dollars (the average is between US$100 - $300), but in
rare cases the fees can range in the thousands. If the photographer is
hired as a contractor, then he or she will also be paid an honorarium.
The local site liaison will also negotiate a fee, generally a daily rate
(see section 2.7). Extra liability insurance for the
photographer or the commissioner may also be required, depending on the
site and subject. There may also be access fees for entering the site
or for using the site at night or when it is closed to the public. Finally,
it may be necessary to pay officials on-site for travel permits, equipment
use, etc.
If legal consultants are required to write up releases and licensing agreements, their fees should be included in this category.
If the project is being funded by federal or non-profit grant agencies or administered by a university or institution, be sure that these costs are covered in the proposed budget and that the institute grant administration procedures will allow the costs to be paid with grant monies.
Post-Production
Unless the project is being run by a university department that can provide
post-production facilities and labor, post-production costs will include
purchase or use or hardware (computers), software, and labor involved
in turning the source images into the final product.
Maintenance of Archive
This often-overlooked item involves the long-term maintenance of the archive.
As network infrastructures, operating systems, and viewing platforms and
software change, the archive must be adaptable in order to remain accessible
and useful. As of this writing, there is no open-source software for viewing
digital panoramas. It is unwise to assume that commercial software manufacturers
will continue to distribute and provide support for current versions of
viewing software forever. It is not enough to store work in a secure and
stable environement: it will require further investments of time and effort
to remain accessible to future users.
Notes:
1. This was done in one location in Rome; a locked metal gate prevented access to a small room, however the bars were wide enough apart that it was possible to set up a tripod and digital scanning camera within the locked area while leaving the controlling laptop on the outside. The entire unit was disassembled outside the gate, then reassembled inside, with cables running out to the controlling computer. The effort resulted in scanning the inside room, which otherwise would not have been visible if the panorama was made outside the locked gate. [back]
2. Channel 360 has production kits that a tripod, panorama head, and software.[back]
3. Wikipedia has entries on the CCD and CMOS chips. For basic information on digital cameras, HowStuffWorks has a more general comprehensive entry. [back]
4. For more information, see "View camera" (Wikipedia), The Luminous Landscape, MAGNAchrom, or Using the View Camera by Steve Simmons (Amphoto Books, 1992). [back]
5. However fish-eye images often need to be remapped to rectilinear projection, as some stitching software will not otherwise work with them. [back]
6. At the time of writing, commercial models include systems such as BeHere, Egg Solution, Remote Reality, 0-360, and Kaidan's 360 One VR. [back]
7. Ansel Adams, The Print (Ansel Adams Photography, Book 3) (Boston: New York Graphic Society, 1984). [back]
8. Many digital cameras can also save high-bit-depth images in formats like TIFF. This also allows for more extensive image manipulation in subsequent editing (as compared with 8-bit formats such as JPEG) but is not as versatile as RAW. [back]
9. Film that has been developed will of course be unaffected by X-ray inspection. [back]
10. Transparency International maintains several lists and surveys of patterns of corruption and bribery around the world. [back]