4. Panorama Creation (Part 1): Methods And Techniques for Capturing Images
4.1. Introduction to types of digital panorama photography and structures
Any image that shows a view similar to or larger than that of the natural human field of view can be called panoramic, but for our purposes we will consider planar, cylindrical, spherical, cubical, and stereoscopic.
A planar/rectinilear panorama is displayed on a flat plane. A digital planar panorama is usually stored as a single, flat-stitch rectilinear rendering image that can be viewed using standard image viewing software.
Cylindrical panoramas depict a horizontal field of view that is 360° around but has vertical constraints. The limits of the vertical field of view depend on the equipment used and/or the way the image is cropped. If flattened out, horizontal lines that are straight in reality become curved, while straight vertical lines remain straight. A cylindrical panorama is intended to be viewed as if it were wrapped into the shape of a cylinder and viewed from within. The viewer must use special software that can display a wrapped image, such as Apple’s QuickTime Player, so as to avoid any unnatural curving or distortion. A digital cylindrical panorama is usually stored as a single .mov file, a single flattened image (with distortion), or as a series of rectilinear tile images within a single .mov file.
A spherical panoramic image shows the entire field of view from a single point, 360° horizontally and 180° vertically, allowing the viewer to look in every direction, including the zenith and nadir. The image is wrapped into a sphere and viewed from the center. A flattened spherical panorama is distorted in the horizontal direction, and also slightly distorted in the vertical direction, particularly at what would be the top and bottom “poles” of the sphere. When a sphere is flattened and stretched to fit in a rectangular frame, the distortion at the poles becomes extreme. A digital spherical panorama can be saved as a single .mov file and viewed with an application such as QuickTime, allowing the viewer to see the image without any unnatural distortion. It can also be saved as a single flattened image (with distortion), or as a series of six equirectangular cubical images. Each of these planar images represent a cube face (front, back, left, right, up, and down) and look normal (or rectilinear) to the human eye.
Digital panoramas can also be in the stereoscopic format, where two images are captured only a few inches apart and later combined to form a single anaglyphic image. This allows for the effect of parallax, where objects in the foreground move in relation to those in the background. These images can be viewed using 3D color separation, polarizing, or shutter glasses, and give the viewer an enhanced sense of depth. Usually displayed in a cylindrical form, a digital stereoscopic image can be saved just like a normal cylindrical panorama as a single .mov file or a single flattened image (with distortion).
4.2. Introduction to photography and digitization
The panorama formats discussed here are processed and displayed in a digital environment, but the data they contain can be captured with either film or digital image capture systems. With the advent of digital cameras, digital photography has become a very popular method for capturing panoramic images. Born digital images go directly on a computer straight away, with no degradation in the transfer from camera to computer. If film is used, the photos need to be developed and scanned before they can be manipulated on the computer. This introduces the potential for “noise,” most commonly from dust or dirt on the image or the scanner. Traces of the print medium may also appear (as creases, seams, grain, or margins) once an image has been scanned. However, this does not mean that film should be avoided. There are potential benefits for capturing the images on film, such as the relative flexibility of film in capturing detail over a wide range of contrasting light. Each photographer has his or her own favored technique, and none is necessarily better than another. The overall skill of the content provider is the ultimate determining factor of the quality of the final panorama.
4.3. Selecting image file formats
When choosing the best file format for a particular image, be aware that file format has a bearing on what equipment will be required as well as the use and quality of the final product, budgetary and time constraints, and the intended lifespan of source materials. Many digital SLR cameras can record images as both RAW files and varying sizes and qualities of the JPEG files. Some cameras will allow you to save both RAW and JPEG images simultaneously. The RAW file format produces much larger files than JPEG, so be sure to have sufficient memory to store, back up, and manipulate the files. A 32-bit PCMCIA card reader will speed up the transfer of images from the memory cards to a hard drive. Keep in mind that working with RAW images in post-production also requires additional time for finishing and converting the images before they can be used in creating a panorama.
Large-sized JPEGs are a common choice for the digital panorama photographer; the image quality can be very good. The file size is smaller than RAWs, enough so that it is feasible to take many additional photographs of varying bracketed exposures without having to use any specialized hardware to transfer and store them. Whenever possible, it is also advisable to select a small amount of compression, say 8-10, when choosing the quality of the JPEG in the camera’s options (on a scale of 1-10, where 1 is highly compressed and 10 involves very little compression). The file size will be a bit larger than that of a more highly compressed image, but the quality of the image will be much better. Highly compressed JPEG images are easily recognized by the block-shaped approximations that appear in place of the defined pixels of a high-quality/low compression JPEG.
Consider also saving in multiple formats. The RAW file format is proprietary and can vary from one camera manufacturer to another or even from one model to another. It is possible that future editing and viewing software will not be able to read or work with these file types and that images will be lost.1 By saving in a common image format such as as JPEG, the chances of being able to work with them in the future are higher. Therefore, even if you desire to work with RAW images, you might also want to save in JPEG as well, simultaneously if possible.
Most proprietary RAW files can now be converted to Adobe's new DNG format — effectively a recognized new universal RAW format. Many photographers are now beginning to archive shots in DNG (along with the original RAW and at times a converted TIF) when shooting RAW originals.
The TIF format should definitely be considered when working with images in post-production, although most cameras do not save images in this format. TIF is an uncompressed file format with cross-platform compatibility and a good choice if you desire no reduction in quality. The TIF file sizes are larger than JPEG, but not as large as RAW. Additionally, TIF is not a proprietary format, so you can work with them using popular image-editing software such as Adobe Photoshop.
| Image Size (4992x3328 pixels)2 | File Size (Approx. MB) |
| Large JPEG quality: 8 | 5.5 |
| RAW | 14.6 |
The RAW Image Format
RAW files are a record of the raw data captured by the camera sensor with
minimal image processing applied in the camera. RAW is in fact a generic
term for a number of proprietary formats developed by various camera manufacturers,
all of which are able to generate uncompressed, high-bit-depth image files.
The files are unusable until they have been processed in an image-editing
application which supports their particular file type.
Despite the potential for better image quality, expanded control, and editing options, only a minority of panoramic photographers currently use this format, opting instead for well-exposed, high-quality JPEGs. The need to shoot multiple images of each subject (for stitching) imposes a costly overhead of greatly increased need for storage space (both on location, and for backing up and archiving later), and the larger file size and the extra post-production work required make RAW a less popular format.
Advantages:
- The RAW format records all of the data captured by the sensor. RAW is the closest version at present of a "digital negative," although it has nowhere near the dynamic range of a film negative.
- It has a high bit-depth.
- It is possible to adjust the exposure (about one stop or so) during editing.
- Decisions about white balance, color correction, saturation, contrast and sharpening (among other things) can all be taken during the post-production phase with little or no impact on image quality.
- RAW files can be archived and revisited at a later date to derive new "interpretations" of an image with no loss of quality. However, this assumes that suitable software to manipulate these proprietary formats will still be available.
Disadvantages:
- RAW files use much more space on memory cards and other storage and archiving media.
- They must be post-processed to create editable, usable image types.
- It is a proprietary format which may not be supported in the future.
4.4. Using image capturing systems and lenses
While each photographer will have his or her own equipment and preferred methods for capturing images, there are universal tasks that need to be performed. This section describes the techniques used to create digital spherical panoramas with a Canon 1Ds Mark II full-frame digital SLR with a Canon 14mm lens and a Manfrotto 303SPH spherical panoramic tripod head, but the basic process is similar to any stitch-based image capturing system.
Setting up the equipment should be done efficiently and carefully. Each piece of equipment must be prepared properly so that the images are captured correctly. First, the tripod should be assembled/expanded and set at approximately eye level. The camera should then be checked. Be sure that the memory cards are cleared (if necessary) or that there is sufficient memory in the camera and that you have additional memory on hand. If the lens is not already mounted to the camera body, carefully clean both the lens and the camera before mounting it. Using a blast of air from a hand pump is an effective way to remove dust from the camera’s sensor and the lens.3 For the purpose of taking panoramic images, the lens is set to manual focus with the focus distance usually set to infinity (for outdoor scenes and large interior spaces). This uniform focus allows the maximum amount of the image to stay in focus during the shoot.
The mounting bracket of the spherical tripod head should be placed on the tripod and attached to the camera and all of the potential loose screws should be checked and tightened. Take care that the nodal point4 of the lens does not shift as the camera is rotated and tilted on the tripod. There are several types of spherical tripod heads, but whichever one you use must be set up properly (see section 4.5). Test the nodal point in several directions and planes; tilt the camera so it points straight down at the tripod. Find the rotating point on the tripod and spin the camera around while looking through the viewfinder making sure that the center of the frame stays centered on that point. Test for parallax by placing the tripod in front of a tall nearby object, such as a tree. Look through the viewfinder and pan the camera so that a point on the nearby object is on the extreme right or left edge of the frame. Look past this point and find another object in the distance that lines up directly with the edge of the frame and the nearby object. Then pan the camera all the way to the opposite edge of the frame so that the same point of the nearby object is on the extreme opposite edge. The distant object should line up exactly as before. If it has moved relative to the close object, make adjustments to the tripod head so that there is no shifting of position of the distant object from one extreme edge of the frame to the other.
Once the nodal point has been calibrated, set the tripod in the desired location and adjust it so that the tripod head and camera are level with the ground (check with a level or leveling base). Calculate the number of photographs needed on the horizontal plane, so that there will be enough overlap to stitch the images together (check the documentation of your stitching software). The equipment in this setup requires six frames when rotating the camera 360° horizontally. Panoramic tripod heads have adjustable click-stops, so that as the camera is spun there is a point of resistance as the head passes one of these stops. Set the tripod head to use the correct number of click-stops (in this case, n=6). It is a good idea to set the first click-stop so that the first image is taken directly facing the subject or a clearly defined object, such as a wall or doorway. This will mark the starting and end point for the shoot and will be helpful in the stitching process, where a key object or surface will be the first image to which the rest are stitched.
It is recommended that the camera be in manual rather than automatic mode, since this means that the settings will remain constant through a series of exposures. The camera must be callibrated for each panorama: white balance (see section 4.6.2), aperture, ISO, and shutter speed will depend on the particular environemental variables. If the shoot is indoors near a window or if there is some area of high dynamic contrast, it is advisable to use bracketed exposures, taking several different exposures at each click-stop. It is important to capture all of the exposures without moving the camera so that each image lines up precisely with the rest. Multiple exposures will allow you to later create a composite image or high dynamic range (HDR) image to be used in the panorama, making it possible to show more detail (see section 4.6.1). For example, a composite image shows an interior wall as well as the scene outside an adjacent window. Bracketing can be helpful in many other circumstances as well, providing a number of options for the best exposure to use when stitching the panorama. A consistent exposure level will improve the end result and minimize the appearance of seams in the final product.
Check the camera’s date and time stamp to ensure that it is consistent with the current time zone. Check that image type, file type, and quality are set as desired.
When photographing a scene, get in the habit of spinning the camera in the same direction every time, pausing at each click-stop to capture the images. It is helpful to use a remote shutter release to minimize camera movements and to keep the photographer out of view. If possible, avoid people or objects that are moving in the frame so that there is maximum consistency between frames to help in the stitching process. Work carefully but quickly to minimize change in the lighting situation. If the tripod is bumped or moved during the shotting of a panorama, the images will not stitch properly, and you will need to start over. If your camera can do it, create a new folder on the memory card for each set of images of a panorama. Another useful trick it to take a photograph of a piece of paper with details of the shoot location etc. (like a director's clap-card) written on it to mark the beginning of a set of images and to record important metadata.
Spin the camera 360° around the horizontal plane, then tilt the tripod head about 60°5 up so that the camera is angled towards the ceiling or sky and spin it around again. Be sure to provide enough overlap between frames to complete coverage of the top of the sphere of the panorama. It’s often a good idea to also tilt the camera straight up 90° to the zenith to complete the sphere. Finally, point the camera straight down 90° to the nadir (at the tripod). Use a color-card and north arrow at the nadir for color and orientation guidance. Capture the image at the starting click-stop and then spin the camera 90° (even if there is no click-stop there) and capture this frame. Be sure that your feet and shadow are not visible. By spinning the camera in this position, all or a majority of the tripod can be removed in post-production.
Take a moment to review the images to make sure that all of the necessary images have been captured and that there are no obvious flaws in them. Conspicuous dust or avoidable sunspots are much more easily eliminated on location than in post-production. Don’t hesitate to take additional photographs if needed. Once you are satisfied with these images, have an assistant hold his or her hand at the spot where the lens is located. The assistant must then stand still, marking that exact point in space, without moving, while you remove the tripod from the scene, place a color bar, north arrow, and meter stick on the ground in the field of view (see section 4.6.4), and then put the camera back in the place marked by the assistant's hand (the assistant should then move out of the shot). Take a hand-held photograph straight down at the ground, using a faster shutter speed if necessary to avoid blurring the image. This final shot will be useful in post-production when removing the tripod from the panorama.
Working with a rotational film camera
An example of a current state-of-the-art rotational panoramic
film camera is manufactured by the Swiss firm of Seitz Phototechnik. This
section describes their 220VR model, but much of it also applies to other
cameras of similar design. This motorized, computer-controlled camera
uses 220 film and can capture a 360° cylindrical panorama in a single
exposure. It can be used with a variety of interchangeable lenses; shorter
focal lengths yield greater vertical fields of view (when used for interactive
panorama creation, suitable lenses might range between 14mm and 35mm focal
length). An example of a negative made with a 20mm lens (Fig.
1). As with other cameras of this type, a narrow vertical slit
(0.8mm in this case) is interposed between the lens and the (curved) film
plane. Such a system allows rapid image capture; a typical exposure of
an outdoor scene — the time it takes for the camera to complete
a rotation — is just a few seconds (an effective "shutter speed"
of say 1/60 second), sufficient to capture moving elements in the scene
without significant blurring.
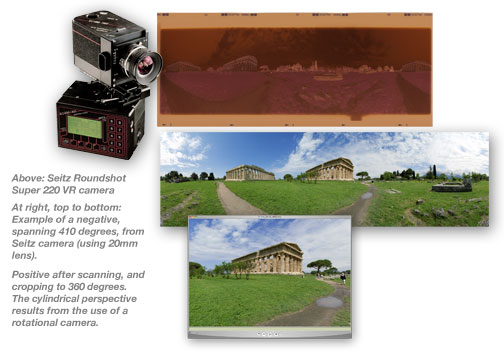
Figure 1. Seitz 220VR rotational film camera.
Once a viewpoint for a scene has been chosen (and all the usual considerations for selecting camera position and height apply here) and a focal length selected, the tripod-mounted camera must be levelled, and the camera’s control unit programmed. First, choose between auto or manual exposure. In auto mode, the camera will perform an initial scan of the scene and set an exposure. This model also offers an option called "variation" in which it will also speed up and slow down during its rotation, the better to record detail in highlights and shadows respectively. In this case the initial scan displays the brightness levels graphically, as a kind of histogram. These values can be accepted, or further modified (smoothed, clipped and so on) by the photographer. Depending on the scene, this can be extremely useful, but, as with all automatic exposure systems, there are reasons to use the manual mode. In that case, take a light reading with an incident exposure meter, usually favoring the darker parts of the scene (color negative film's wide exposure latitude will tolerate a good deal of overexposure, so generally it is best to expose for the shadows, or at least lean in that direction).
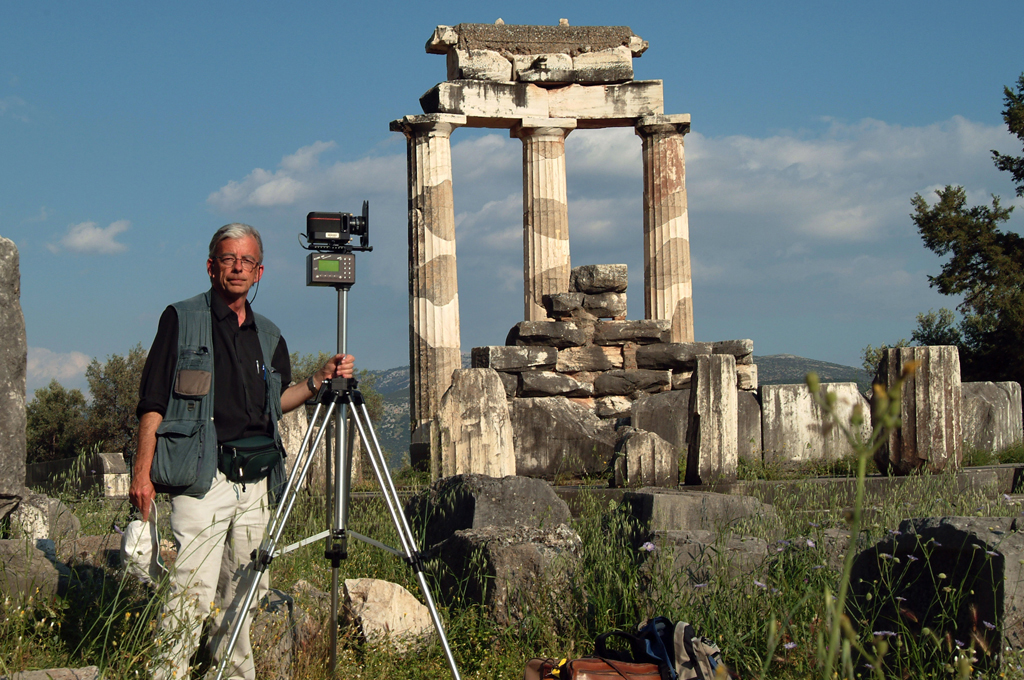
Figure 2. Brian Donovan in Delphi, Greece, with a Seitz rotational panoramic
film camera (Seitz 220 VR model). Click picture to enlarge. Photo by Brian
Donovan.
With the exposure settings made, one must then input the desired degrees of image capture; this can be almost any value, from just 45° to more than 360°, the only practical limit being the length of the film. For a typical 360° panorama you might use a value of 420°, to allow sufficient overlap for the single stitch needed in post-production to "wrap" the two ends of the image. Other settings requiring input include the focal length of the lens and focus distance (usually infinity for an outdoor scene). Once the exposure is started, it is just a matter of ducking down beside the tripod to get out of shot, or, for a lengthier exposure (which can be up to ten minutes or more in a gloomy interior) to walk around behind the camera (Fig. 2) or even go away out of shot altogether for a coffee. That done, it’s time to decide if further shots are needed, either to bracket exposures, or perhaps, if the scene contained say people moving about, to have a second shot to combine with the first to exclude certain scene elements.
Finally, be sure to note key attributes of the shoot — date, time, exposure, maybe GPS data — as an aide-mémoire (a film camera will not record this metadata). Then, and also as a result of using a film camera, you will have the often anxious wait until the film is processed, and the process of post-production (scanning the negatives, image-editing, and QTVR authoring) can begin.
4.5. Panoramic tripod heads
There are several types of spherical tripod heads. Some are fixed and designed for specific camera and lens combinations, while others require calibration and can be adjusted for many different setups. The Manfrotto 303SPH can be adjusted for use with different cameras and lenses. If the tripod head is properly callibrated, you can avoid problems with parallax. Precision360 has both an adjustable tripod head and a fixed system designed for a specific setup. With this system no calibration is needed, and the results will be consistently proper. KAIDAN is another popular panoramic head manufacturer, with models such as the Kiwi+ and the QuickPan heads.
There are pros and cons to each type of system. When using the Precision360, the perfect calibration will provide a set of images that will stitch the same way every time. This allows automated stitching scripts, such as Ken Stuart’s Perl scripts. The calibration of the tripod head does not need to be checked, allowing for faster setup. Multiple exposures will line up perfectly, even if the tripod head is rotated around in-between shots, making for better composite and HDR results. However, if the tripod head bends or breaks while on the road, it may be difficult to fix or replace it, so it may be best to have a back-up tripod head, just in case. Similarly, if the camera breaks, the back-up camera and lens must have the exact same physical dimensions in order to use the same Precision360 tripod head.
On the other hand, a non-fixed tripod head fits with various cameras and is made up of smaller, easier-to-find, and less expensive pieces (and therefore easier to fix). This is less of a financial and administrative burden. Additionally, if the calibration of the tripod head is compromised, it might be possible to simply make a few adjustments to get back up and running. However, calibration must routinely be checked during the set-up process. A system made up of smaller independent parts can potentially lead to a less stable, predictable, and precise unit, especially after heavy use. This lack of precision means that the images may not be captured the exact same way each time, thus making it difficult or impossible to use automated scripts to stitch the panorama. There is a small amount of "float" at each click-stop, especially after heavy use, which means that pixels will not line up exactly the same way from pane to pane. If multiple exposures are needed, but the tripod head is moved between shots, they might not line up exactly, making it more difficult to create composite images in post-production.
4.6. Photographic workflow
Work efficiently but allow enough time to capture quality images properly and to get as much data as possible. Fix problems on-site wherever possible. For example, upon review of the images in the camera while at the shoot, it is easier and much less time-consuming to remove a trash can from the scene and shoot that frame again, rather than attempting to take it out during post-production. While much can be done in post-production and some things are simply out of the photographer's control, it is best to take the time to get the best quality images while on location.
It is good practice to build a proxy panorama (a low-resolution quick stitch and rendering) while still on or near the shoot so as to ensure that the images are usable and correct. Resample a set of images to low-resolution versions and stitch together a rough panorama as a sort of test run. This will confirm that the tripod head, if adjustable, was calibrated properly and will expose any problems that may have been overlooked during the shoot. A proxy panorama will also make it easier to locate the exact position, should the need arise to return to the location.
Similarly, when shooting with film it is good practice is to have it developed at a trusted shop before leaving town. This will provide some quality assurance. This will also help protect against damage to undeveloped film that can occur with exposure to airport scanning machines.
Proper tripod positioning is a fundamental issue. The panorama needs to include areas or objects of interest chosen by the commissioner. This often includes locations where a viewer would naturally be standing or walking (e.g., in front of a frequently used doorway or on a path), perhaps within view of a preceding panorama site. In such cases crowd control can be a problem. It is sometimes desirable to use bystanders to create a sense of scale, and to show the current use of the site (see section 4.6.4), but it is always important to protect your equipment. And, of course, the images must be consistent from one frame to the next. When bystanders are included, it may be necessary to get model releases or permission from local authorities (see section 3.4).
4.6.1. Lighting
Under most circumstances, it is preferable to use available natural light. This will produce a realistic representation, and it is often important to show the effects of natural light in the space. Adding unnatural light may undermine the intentions of the architect and distort the space (see sections 2.3 and 2.8).
Relying solely on natural light avoids all of the problems introduced with artificial light. Lighting apparatus are often bulky, heavy, fragile, and expensive. Voltage differs around the world, so either an unwieldy transformer or an additional set of light bulbs may be required (i.e. 120V in the USA, 220V in Europe, 240V in the UK). Power can often be difficult, since older spaces may have outdated, unsafe, or non-existent electrical systems. Artificial lights may need to be moved so that they do not appear in the images, adding to the challenge of keeping the light even as the camera pans across the scene.
Matching the color of artificial light with existing natural light is another challenge. Tungsten bulbs can be matched to the sunlight coming through the windows by using blue (or CTB – Color Temperature Blue) gels. However, it is difficult to obtain a perfect match, and gels reduce the amount of light thrown. Larger spaces require more light and more power, increasing the expense and difficulty.
HMI (Hydrargyrum Medium arc Iodide) lights put out an extraordinary amount of light that matches the color temperature of sunlight, thus eliminating the need for filters and gels. The downsides are the very high price of the equipment, and the weight of the high-voltage transformer needed to supply power. Again, moving the equipment during the shoot makes even lighting of the scene difficult. Flashes mounted on a camera’s hot shoe or used externally bring with them similar considerations and concerns as other types of artificial lights.
One solution to a low-light situation is multiple exposures. Photographing with a long exposure captures detail even in dark areas. However, while details in shadow increase, high-contrast areas such as light sources (windows, light bulbs) can become overexposed. When a light source is in the frame, capture many exposures, ranging from a long exposure metered to the shadows through to a short exposure metered to the light source and highlights. This will allow for a composite image in post-production that shows the wall, the window, and even the scene outside the window.
High Dynamic Range (HDR) images are a type of composite image that can combine many exposures over a wide dynamic range. Computer software takes the various exposures and flattens them out so that no area of the resultant image is over- or underexposed. Results can vary depending on the software used, the quality and variety of the source images, and the amount of contrast in the frame.
4.6.2. Color management/white balance in the field
Properly setting the white balance of the camera will ensure that the color of the resultant image is accurate. There are several choices when setting the camera’s white balance. A white object or an 18% gray card sets the custom white balance of some cameras. With some DSLRs, take a photo of the card, making sure it fills the frame, and then select it as the white balance source. You can also rely on the camera’s automatic white balance setting. This does not require any set-up, and will work quite effectively in any setting although it can lead to different frames of a single panorama having different white balances.
One way to ensure accurate color is to use a color control device (see section 4.6.4), which allows adjustments in post-production to correct for any color discrepancy. Regardless, it is important to check the results before leaving the site for accurate color.
If the site already has artificial lights, it may be necessary to ask the site's authorities to turn them off. They can throw off the white balance, and the lights and the areas they illuminate may be incorrectly colored in the image. A long exposure time with available natural light will overexpose artificial lights and create unnecessary areas of high contrast. It is best to avoid them altogether if possible by having them turned off before the shoot.
4.6.3. Environmental issues and special situations
Panographers are always at the mercy of Mother Nature. Generally, grey, overcast skies are often best for interior photography, because the light is diffuse and even, and casts fewer shadows that might shift quickly. Sunny, clear skies are usually desired for exterior photography, to maximize the illumination of the subject. Pre-dawn or night shoots shift concern to moonlight, city lights, and artificial illumination of the subject.
If weather conditions produce rain, snow, or other types of precipitation, it may be difficult or even impossible to work outside. It is therefore advisable to be flexible and allow for alternate dates. Where necessary, bring an umbrella and hope for the best.
The commissioner may desire a particular environmental condition to bring out a particular detail. For example, snow on the ground reflects light into interior spaces. Bright direct sunlight can create strong shadows that are an important aspect of the architect’s design. Take these possibilities into account when choosing the date and season in which to work. Research likely environmental conditions and be prepared for possible problems in the shooting schedule (see section 2.4).
4.6.4. Site data documentation
The viewer should be offered as much information as possible. A number of variables can be documented on site to add context and ensure accuracy. A north arrow placed in the scene, added during the shoot orients the subject. A meter stick, level, or some other object that provides a sense of scale is also helpful. As long as it is permissible, including people in the shot can provide useful or even vital information about the scale of an object or space as well as its current use (e.g., worshippers moving through a sacred space).
When adding items to the scene, try to make their placement as discrete as possible, and definitely try to avoid obstructing a detail or object of interest. If this is unavoidable, take photographs both with and without the items, so as to have more options in post-production.
It is essential to include a form of color control, such as a color bar containing several colors splotches. These can later be used to ensure the accuracy of the colors in the image by comparing the colors on the bar with the those colors on the computer display.
Geo-referencing or Global Positioning System (GPS) data are also quite valuable and add to the body of contextual information associated with the panorama and site.6 The data from the GPS unit(s) can be digitally associated with the images taken at a particular position by synchronizing the timecode from both the GPS unit and the camera. Assuming that the GPS readings and the panoramic images are taken at approximately the same time, the metadata can serve to link images with a particular location.
4.6.5. Short-term back-up
Back-up digital images as soon as possible. It is imperitive to have redundant copies of the data on at least two independent systems in case one of them becomes lost, corrupted, or damaged. The back-up procedure should be routine but it should not cut into the time allotted for image capture. If it is possible, download images from the camera to a laptop while still on site and free up the camera. Do not delete images from the camera until they have been backed up on more than one drive. A card reader and multiple memory cards will also keep the camera free to continue to capture photographs. A 32-bit PCMCIA card reader can deliver a high data transfer rate as compared to one with a USB connection. If the laptop’s hard drive lacks the necessary space, consider using a mobile hard drive that does not require external power. Even an iPod makes a fine short-term back-up device.
When using film, have it developed before leaving the area, if possible.Better yet, scan and back-up the images before leaving.
Duplicate sets of data should also be sent to separate geographic locations. Burn and send DVDs home or to some other secure location. That way, if equipment is damaged, lost, or stolen while still on the road, the data will be intact.
4.6.6. Short-term storage of images and organizational structure
When backing up images after a shoot, use the opportunity to organize and label files so that they can be easily sorted and accessed. This should be done while the information is still fresh in everyone’s memory. Document as many relevant details as possible, especially when photographing multiple sites on a single trip. At minimum, save images of a particular site in a single folder. Better yet, put sets of images of single panoramas in separate sets of folders labeled with precise locations. Create a hierarchical system with as many levels as needed. The individual panorama folder should reside in the folder dedicated to the site, which should in turn be in the city folder, in the appropriate state folder, and finally within the country folder. See section 6.3.1 for more about file and directory naming and organization.
Organizing images immediately after a shoot also is a good opportunity to review the results and see if any shots need to be repeated.
Notes:
1. The OpenRAW web site addresses this problem and is petitioning camera makers to use a common, open source file format for RAW image files. [back]
2. Data taken from Canon EOS-1 Ds Mark II Digital Camera Instruction Manual (p. 45). [back]
3. The sensor is a very delicate (and expensive) part of the camera, and extreme care must be taken when cleaning it. Please refer to the manufacturer when attempting to clean your camera and sensor, or refer to a professional technician. [back]
4. See http://www.edb.utexas.edu/teachnet/QTVR/NodalPoint.htm. [back]
5. The specific tilt depends on the camera and lens length. Some cameras can capture an entire sphere with just one row at 0, a zenith of +90, and a nadir of -90. [back]
6. Depending on the accuracy of the GPS device, it might be best to use multiple devices and take the average.[back]